皆さん、こんにちは~☆ シアです。
本サイトでは、記事のSNSシェアに今まで「WP Social Bookmarking Light」を使用していましたが、サイトパフォーマンスの改善のために、現在は独自に実装したSNSボタンにしています。
今回は、本サイトで設置しているSNSボタンの作り方を紹介したいと思います。
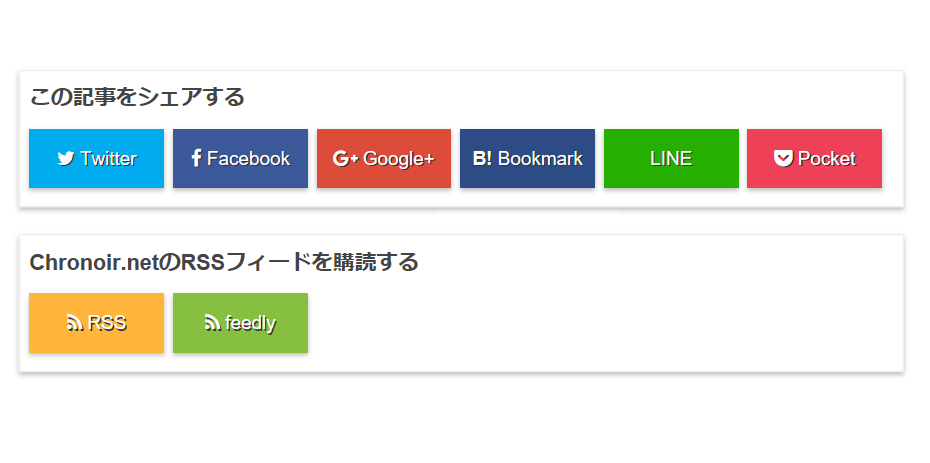
1. 本サイトで設置しているSNSボタン
ちなみにChronoir.netでは、
- Google+
- はてなブックマーク
- LINE
の計6種のSNSボタンと
- RSSフィード
- freedy
の計2種のRSSフィードボタンを設置しています。また、SNSボタンは記事の上下2つに配置しています。
デザインはマテリアルデザインに仕上げています(ミョウガ案)。
2. SNSボタンを設置してみよう
2.1. SNSボタンを設置するPHPファイルを作成
では早速、SNSボタンを設置するPHPファイルを作成します。
まずは、記事のタイトル及びURLをURLエンコードした文字列と記事執筆者のSNSアカウント情報を取得する関数を作成します。
記事のタイトルはget_the_title関数、記事のURLはget_permalink関数で取得し、urlencode関数を使って、文字列をURLエンコードします。
SNSアカウントは、WordPressに登録しているユーザーアカウントにSNSアカウントと関連付けて、記事から執筆者のSNSアカウント名を取得しています。
Twitterのシェア用ツイートのviaを記事執筆者のユーザー名にしてみよう
【脱プラグイン作戦】SNSボタンをプラグインなしで実装してみました。
取得したデータを1つの連想配列にまとめて、return文で返します。
<?php
// 記事やその執筆者アカウントの情報を取得します。
function get_article_sns_account_info() {
	$sns_account_info = array(
		"title" => urlencode( get_the_title() ),
		"url" => urlencode( get_permalink() ),
		"sns_info" => array(
			"twitter" => "[既定のTwitterアカウント名]"
		)
	);
	// 執筆者のSNSアカウント情報を取得します。
	$post = get_post( $post_id );
	if( $post ) {
		$author = get_userdata( $post->post_author );
		if( $author->twitter != '' ) {
			$sns_account_info["sns_info"]["twitter"] = $author->twitter;
		}
	}

	return $sns_account_info;
}

// 中略
?>次に、SNSボタンを設置する関数を作成します。引数で先ほど作成した関数の戻り値を受け取り、SNSボタンのリンク文字列で必要なパラメーターに指定します。
<?php
// 中略

// SNSシェアボタンを配置します。
function article_social_buttons( $sns_account_info, $header = "" ) { ?>
<div class="air-md-social-button-area">
<?php
	// $headerに文字列が格納されている場合、ラベルを出力します。
	if( $header != "" ) { ?>
	<div class="title"><span class="title-fill"><?php echo $header;?></span></div>
<?php } ?>
	<div class="air-md-social-buttons clearfix">
		<!-- Twitter -->
		<div class="twitter">
			<a class="opensub" href="http://twitter.com/share?original_referer=<?php echo $sns_account_info["url"]; ?>&text=<?php echo $sns_account_info["title"]; ?>&url=<?php echo $sns_account_info["url"]; ?>&via=<?php echo $sns_account_info["sns_info"]["twitter"]; ?>" target="_blank"><i class="fa fa-twitter"></i> Twitter</a>
		</div>
		<!-- Facebook -->
		<div class="facebook">
			<a class="opensub" href="http://www.facebook.com/sharer.php?src=bm&u=<?php echo $sns_account_info["url"];?>&t=<?php echo $sns_account_info["title"];?>" target="_blank"><i class="fa fa-facebook"></i> Facebook</a>
		</div>
		<!-- Google+ -->
		<div class="googleplus">
			<a class="opensub" href="https://plus.google.com/share?url=<?php echo $sns_account_info["url"];?>" target="_blank"><i class="fa fa-google-plus"></i> Google+</a>
		</div>
		<!-- Hatena Bookmark -->
		<div class="hatena">
			<a href="http://b.hatena.ne.jp/entry/<?php echo $sns_account_info["url"]; ?>" target="_blank"><strong>B!</strong> Bookmark</a>
		</div>
		<!-- LINE -->
		<div class="line">
			<a href="http://line.me/R/msg/text/?<?php echo $sns_account_info["title"]."%0A".$sns_account_info["url"];?>" target="_blank">LINE</a>
		</div>
		<!-- Pocket -->
		<div class="pocket">
			<a class="opensub" href="http://getpocket.com/edit?url=<?php echo $sns_account_info["url"];?>&title=<?php echo $sns_account_info["title"];?>"><i class="fa fa-get-pocket" target="_blank"></i> Pocket</a>
		</div>
	</div>
</div>
<?php }

// 中略
?>
参考までに、Twitter、Facebook、Google+、はてなブックマーク、LINE、Pocket用のリンクを載せておきます。
// ツイートして、記事をシェア


http://www.facebook.com/sharer.php?src=bm&u=[記事のURL]&t=[投稿に表示する文字列]"https://plus.google.com/share?url=[記事のURL]// はてなブックマークに追加


http://line.me/R/msg/text/?[記事のタイトル]%0A[記事のURL]http://getpocket.com/edit?url=[記事のURL]&title=[記事のタイトル]次に、RSS購読ボタンを設置する関数を作成します。SNSボタンを設置する関数をベースに、RSSフィードとfreedy用に書き換えます。また、freedyに指定するRSSフィードのURLはURLエンコードする必要があります。
<?php
// 中略

// RSSフィード購読ボタンを配置します。
function article_rss_buttons( $header = "" ) {
	$home_url = home_url();
?>
<div class="air-md-social-button-area">
<?php if( $header != "" ) { ?>
	<div class="title"><span class="title-fill"><?php echo $header;?></span></div>
<?php } ?>
	<div class="air-md-social-buttons clearfix">
		<!-- RSS -->
		<div class="rss">
			<a href="<?php echo $home_url; ?>/?feed=rss2" target="_blank"><i class="fa fa-rss"></i> RSS</a>
		</div>
		<!-- Freedy -->
		<div class="freedy">
			<a href="http://feedly.com/index.html#subscription%2Ffeed%2F<?php echo urlencode( $home_url );?>%2Ffeed%2F" target="blank"><i class="fa fa-rss"></i> feedly</a>
		</div>
	</div>
</div>
<?php }
?>http://feedly.com/index.html#subscription%2Ffeed%2F[RSSフィードのURL]2.2. アイコンフォントのスタイルシートを追加
「Font Awesome」というWebフォントアイコンを利用すると、シェアボタンのアイコンを簡単に追加することができます。
footer.phpにある</body>の前に以下のコードを追加します。
<?php /* 中略 */ ?>

<link href="//netdna.bootstrapcdn.com/font-awesome/4.6.3/css/font-awesome.min.css" rel="stylesheet"/>
</body>
</html>
※テーマによっては、はじめから「Font Awesome」が追加されているものもあります。
2.3. CSSの設定
SNSボタンを設置するPHPファイルを作成したら、テーマのCSSファイルを編集します。
/* Social Buttons */

/* SNSボタンエリアの枠 */
.air-md-social-button-area {
	margin: 0 0 20px 0;
	padding: 7px;
	border: solid 1px #EEE;
	/* 以下の3行を追加すると、枠がマテリアルデザインのようになります。 */
	box-shadow: 0px 2px 5px rgba(0,0,0,0.26);
	-webkit-box-shadow: 0px 2px 5px rgba(0,0,0,0.26);
	-moz-box-shadow: 0px 2px 5px rgba(0,0,0,0.26);
}

/* SNSボタンエリア内のタイトル */
.air-md-social-button-area .title {
	font-weight: 700;
	font-size: 16px;
	line-height: 1.6;
	margin: 0 0 10px 0;
}

/* SNSボタンエリアの枠の後のスタイル設定 */
.air-md-social-button-area:after {
   content: '';
   clear: both;
   display: block;
}

/* SNSボタンのスタイル */
.air-md-social-buttons div {
	float: left;
	margin: 0 1% 1% 0;
	box-sizing: border-box;
}

.air-md-social-buttons div a {
	position:relative;
	font-size:80%;
	display: block;
	text-align: center;
	color: #fff;
	font-size: 14px;
	width: 100px;
	padding: 10px 0;
	box-sizing: border-box;
	text-decoration: none;
	text-shadow: 1px 1px 0px #333;
	box-shadow: 0px 2px 5px rgba(0,0,0,0.26);
	-webkit-box-shadow: 0px 2px 5px rgba(0,0,0,0.26);
	-moz-box-shadow: 0px 2px 5px rgba(0,0,0,0.26);
}

.air-md-social-buttons div a:hover {
   text-decoration: none;
   filter:alpha(opacity=70);
   -moz-opacity: 0.70;
   opacity: 0.70;
   box-shadow: 0px 4px 12px rgba(0,0,0,0.52);
	-webkit-box-shadow: 0px 4px 12px rgba(0,0,0,0.52);
	-moz-box-shadow: 0px 4px 12px rgba(0,0,0,0.52);
}

/* Twitter */
.air-md-social-buttons div.twitter a {
   background-color: #00ACEE;
}

/* Facebook */
.air-md-social-buttons div.facebook a {
   background-color: #3B5998;
}

/* Google+ */
.air-md-social-buttons div.googleplus a {
   background-color: #DD4B39;
}

/* はてなブックマーク */
.air-md-social-buttons div.hatena a {
   background-color: #2D4C86;
}

/* LINE */
.air-md-social-buttons div.line a {
   background-color: #25AF00;
}

/* Pocket */
.air-md-social-buttons div.pocket a {
   background-color: #EE4056;
}

/* RSS */
.air-md-social-buttons div.rss a {
   background-color: #FFB53C;
}

/* freedy */
.air-md-social-buttons div.freedy a {
   background-color: #87C040;
}
2.4. ボタンを押した時、ポップアップを表示するスクリプトを作成
SNSボタンの内、Twitter、Facebook、Google+、Pocketでは、ボタンを押した時に下図のようなポップアップウィンドウを表示するJavaScriptコードを作成していきます。
CSSの「opensub」クラスのある要素をクリックした時に実行する処理を匿名関数で記述します。href属性からSNSボタンURLを取り出し、window.open関数でポップアップウィンドウを開きます。
jQuery( document ).ready( function ( $ ) {
    $( ".opensub" ).click( function() {
		// ここのthisは、クリックした要素(本記事では、a要素)を表します。
		window.open( this.href, "WindowName", "width=552,height=412,resizable=yes,scrollbars=yes" );
		return false;
	})
});jQuery(document).ready(function(o){o(".opensub").click(function(){return window.open(this.href,"WindowName","width=552,height=412,resizable=yes,scrollbars=yes"),!1})});作成したJavaScriptのコードをfooter.phpにある</body>の前に追加します。
<?php /* 中略 */ ?>

<script type="text/javascript">
jQuery(document).ready(function(o){o(".opensub").click(function(){return window.open(this.href,"WindowName","width=552,height=412,resizable=yes,scrollbars=yes"),!1})});
<link href="//netdna.bootstrapcdn.com/font-awesome/4.6.3/css/font-awesome.min.css" rel="stylesheet"/>
</script>
</body>
</html>
これで、SNSボタンを設置するコードができました。
2.5. SNSボタンを設置する
funcions.phpを編集し、require_once文で今回作成したPHPファイルを読み込むようにします。
<?php
require_once locate_template('lib/social-buttons.php');

// 中略
?>contetnt.phpとcontent-page.phpにある「entry-content」の中で今回作成した関数を呼び出し、SNSボタンを設置します。
<div class="entry-content">
<?php
	$article_sns_account = get_article_sns_account_info();
	article_social_buttons( $article_sns_account );
?>
<?php the_content( __( 'Continue reading <span class="meta-nav">→</span>', 'themonic' ) ); ?>
<?php article_social_buttons( $article_sns_account, "この記事をシェアする" ); ?>
<?php article_rss_buttons( "Chronoir.netのRSSフィードを購読する" ); ?>
<?php if( function_exists( 'related_posts' ) ) { related_posts(); } ?>
<?php wp_link_pages( array( 'before' => '<div class="page-links">' . __( 'Pages:', 'themonic' ), 'after' => '</div>' ) ); ?>
</div><!-- .entry-content -->
3. SNSボタンを換装した結果
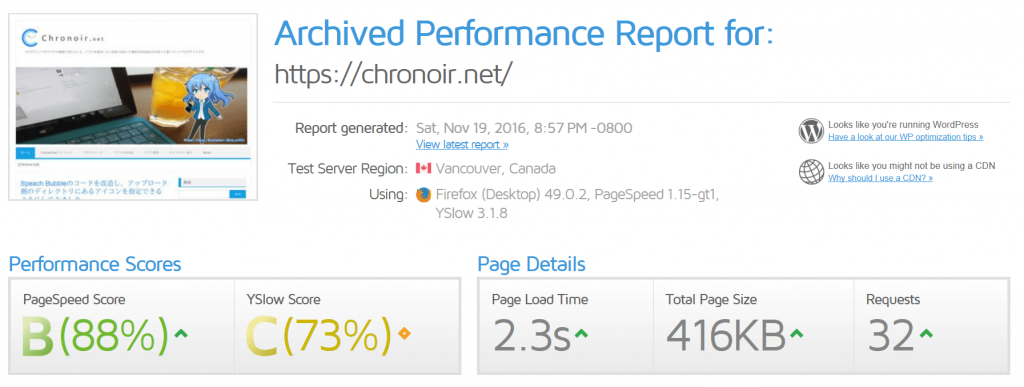
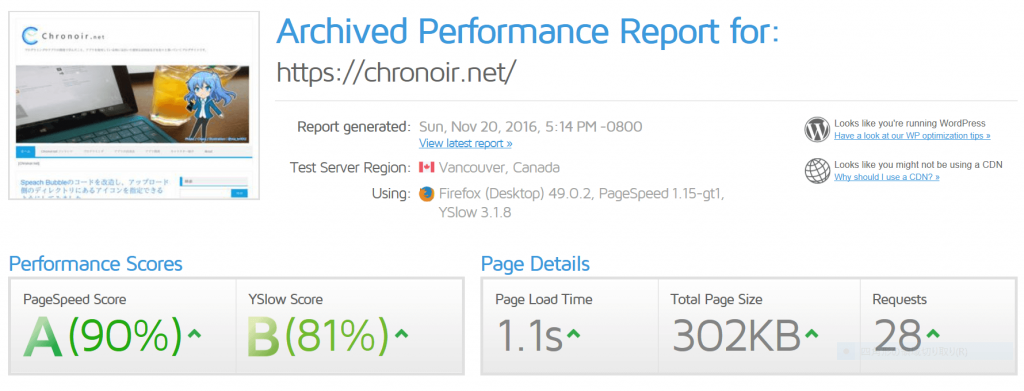
SNSボタンの換装後に「GTMetrix」でサイトの速度を測定したらパフォーマンスが上がり、特にYSlowでは8%も上がりました。
プラグインを減らしたことで冗長な処理が減ったのと、公式のSNSボタンから独自実装に変えたことで外部サイトへのリクエスト(シェア数のカウントなど)がなくなったのが要因かな。
脱プラグイン作戦はまだまだ続きますよ~!
それでは、See you~☆


コメント